RSS

Category Archives: Desserts

baking feats tried and tested

A Birthday Wrapped up in a Pseudo Red Velvet Cake :)

It was Sammy’s birthday (few weeks ago!)!! She turned a quarter of a century old and it was definitely time to celebrate!

We started off the celebrations in the weekend with her special request of a red velvet birthday cake. All well and good – if only I knew what went into a red velvet cake! Colouring? Dye? Few vegetables mixed together? So here I am a novice, armed with Dr.Google searching for the easist red-velvet cake recipe that I could find.

BUT who knew that a red cake can be so complicated? From research, many bloggers argue about what is and what isn’t a red velvet cake and different people put different things to make the cake red – most people (including the recipe found in Nigella Lawson’s cookbook) use red colouring to make the cake red, which technically would be the easier option, but was told, not the tastiest option.

Which way to go was confirmed when Miss Sammy said that she wanted a red velvet cake au naturale (I know, how picky right?!?!). So I throw away that thought of red dye in my sponge and start the research for red velvet cake from scratch, pressing all the ‘x’s on my tabs for those that had red dyes in their recipe.

From the recipes and some blog posts that we have found, it looks like it depends on the acidity of the cake that produces that red colour. Too little acidity, and the cake will turn to ‘purple satin’ or dark brown (almost chocolatey like) – so the key to create and maintain that red colour is…use the reddest natural vegetable/fruit you can find, and maintain the acidity in the cake. YUP! sounds easy enough…RIGHT?

Because I had no experience baking a red velvet cake, I used the recipe from Sophistimum (thank you! It was an awesome recipe! And yours looked MUCH better!) pretty much word for word, except for the natural cocoa which I didn’t have, but I have read that it is crucial that you use natural instead of dutch-processed cocoa because that maintains the acidity in the cake. Hence the result of my rich, dark PURPLE cake. I have to find this natural cocoa! But the result was so GOOD, so moist and so rich, and for those who don’t like beetroot, you can hardly taste it in the cake. I would definitely try this again, and this time with natural cocoa (because I found where I can buy it – Koko Black!). Next time, it will be called High Class Red Velvet Cake…
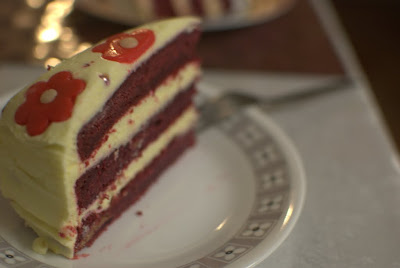
Natural Red Velvet Cake - No Colouring

Red Velvet Cake (Adapted from Sophistimum)

2 large beetroots (enough for 1 1/2 cups puree)
1/4 cup freshly squeezed lemon juice
1 tablespoon vinegar
230g unsalted butter, softened
250g of cream cheese, softened slightly
2 cups castor sugar
4 eggs
1 1/2 teaspoons pure vanilla extract
2 cups unbleached all-purpose flour
1 1/2 teaspoons baking powder
1 1/2 teaspoons salt
4 tablespoons natural (not dark or dutch processed) cocoa powder

Steps:

  1. Preheat the oven to about 180 degrees celcius. Cut up the beetroot into large chunks and then place them on a roasting tray and pour in a cup of water. Then, roast the beetroot for about an hour until cooked through and soft, then take it out to let it cool.
  2. Meanwhile, line the bases and sides of 3 cake pans with baking paper and set aside.
  3. When the beetroot has cooled down, blend and puree the beetroot along with the lemon juice and vinegar in your handy food processor until you have a lovely puree of beetroot (yummm – some members in my family will beg to differ!)
  4. Preheat your oven again to 180 degrees celcius. In your mixer, cream the butter and cream cheese together until smooth, and then add in the sugar until the batter is well combined.
  5. Add the eggs in one at a time into the batter, just incorporating the egg into the batter before adding another one in. Then mix in the vanilla essence.
  6. In a separate bowl, mix the dry ingredients together (flour, baking powder, salt and cocoa powder). Then add the dry ingredients in the beetroot batter and fold until well combined.
  7. Then, divide the cake batter equally into the 3 prepared pans. We used measuring cups to help us divide them up equally, but you don’t have to be so OCD like us!
  8. Then bake in the oven for about 20 minutes, or until cooked through (you’d know when you put in a toothpick or skewer through the middle of the cake and it comes out clean). Then invert them onto a rack to cool completely before frosting.

Cream Cheese Frosting

2 packets cream cheese, at room temperature
230g unsalted butter, at room temperature
3 1/2 cups icing sugar
2-3 tablespoons heavy cream
2 teaspoon pure vanilla extract

Using a whisk attachment, combine all of the above into the bowl of your mixer and mix until fluffy, smooth and enough to be spreadable.

Decorations

Decorations were simple for Sammy’s cake – all I did was buy boxed marzipan (from one of the shelves off Coles) and red dye. Then I infused the marzipan with the red dye until the desired colour (remember to use gloves when doing this, or you get blood on your hands!! sorry, bad joke). And then I rolled it out and used flower cutters to cut out the outer layer and a nozzle tip to make the round, circular middle. Then decorate it around the cake as desired! My inspiration came from…believe it or not Bakery Story (iphone game!).


Tags: , , ,

Making macarons… a series of experiments

Since we started watching Masterchef, we’ve been inspired to make the things they make on the telly. And we especially love watching the masterclass on Friday nights, where the chefs give cooking tips and give techniques. Besides getting cooking tips, we’ve been exposed to a some of Australia’s top chefs, although most of them (probably all) are over east.

So last year, when we went over to Sydney, we made sure we paid a visit to Adriano Zumbo’s pattiserie to try his acclaimed macarons. We were faced with a whole glass cabinet of macarons, and we had a hard time choosing which to try.. and they all looked so pretty and perfect and colourful. So we chose some (can’t remeber what flavours now) and they were awesome! Crunchy shells with soft centres.. nommmms

Adriano Zumbo Patisserie macarons

Since then, we’ve wanted to try our hand at making our own macarons. We knew that these were finicky little bicces, and that lots of things could go wrong. Lots of people have written up lots of tips and do’s and don’ts to successfully make macarons. So, armed with all these information, we set a date to try them out.

Our first macaron making attempt was a failure. The almond meal was too coarse, so it ended up tasting like almond cookies. 😦 It took us a while before we decided to try again. Second time around, it wasn’t great either. Not sure what went wrong, but we suspect an overmixed mixture and under cooking the shells, so we ended up with lemon curd meringue cookies. 😦

Take three – I found this recipe from BraveTart, who had compiled a list of “macaron making mythbusters”, which i thought was interesting to know, it helps in figuring out what I need/need not worry about in making the macarons.

Here’s the link to the recipe – its for a basic macaron recipe. We did a mocha macaron, by taking out 1oz icing sugar and replacing it with cocoa powder and added about 1tbsp of instant coffee powder, ground finely.

Macaron shells
115g blanched almonds or almond meal
200g icing sugar
30g cocoa powder
144g whites
72g sugar
2 tsp vanilla extract
1 tbsp instant coffee granules (ground finely)
1/4 tsp salt

Chocolate Ganache filling
220g dark cooking chocolate
1 cup cream

We had Esther’s help in sifting the almond meal – the most laborious task, as almond meal isn’t as fine as flour and takes FOREVER to get through the sieve.

While Esther was painstakingly sifting the almond meal mixture, we whipped the egg white till it forms a stiff meringue. After that, fold the dry ingredients into the meringue. This should be done in about 40 strokes. (Yes, we were so determined to make this round a success, we counted the amount of strokes when folding it!) A mixture that is mixed right should have the consistency of molten lava. I’ve never seen molten lava, but I guessed that it thinner than a brownie mixture but thicker than a pancake mixture, so I thought it should be done.

After that, the mixture is put into a piping bag and piped onto baking paper. My piping skills aren’t that perfect yet, so I drew out circles with the base of a piping nozzle as a guide on baking paper and piped the mixture on the flip side. I started piping the mixture from the centre towards the outside. If the mixture is the right consistency, it will spread itself out slightly, but still hold its shape. After that, we just let them stand for about half an hour, or until the tops are dry to the touch.

Macaron mixture piped

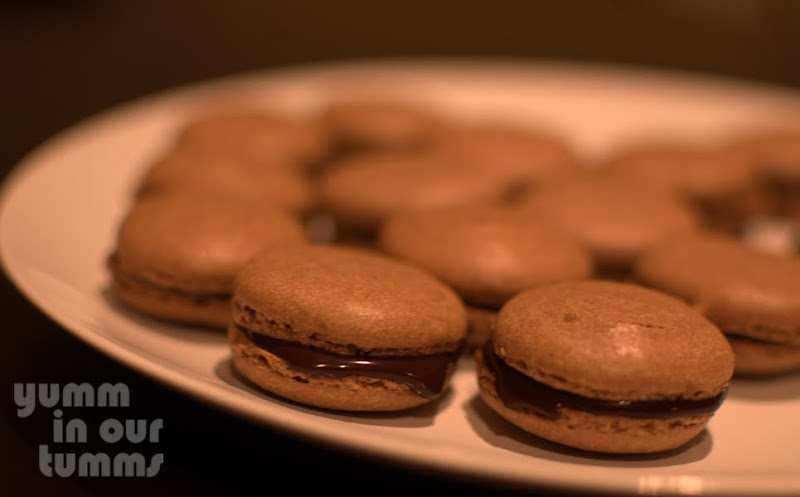
Then, put them in the oven and anxiously wait, crossing your fingers that those macarons will grow their feet (or skirt as some might call it). I snuck a peek while it was baking and did a happy dance when they DID grow feet! YAY! 😀 We filled them with chocolate ganache, and it was YUMMY!

Mocha macarons with chocolate ganache filling

So yea, it took us a few experiments, and a bit of a journey, but we finally managed to make our own macarons. It’s recommended that the macarons be filled and let them sit overnight, as the shells will absorb the filling and create a soft, chewy centre. But we couldn’t help ourselves, we had a few and then left the rest to sit overnight, and I was told they were yummier. (I didn’t get to try them :()

 
2 Comments

Posted by on May 7, 2011 in Baking, Desserts


Tags: , , ,

Getting Ready for Easter: Chocolate & Ginger Easter Egg Tart

Easter is less than 5 days away and I am SO excited – not just for the super long weekend – but because we can celebrate the victory that we have over death and sin through Jesus’ death and resurrection – and it’s a celebration of a new life that everyone can have through Jesus! So yes! I’m REALLY excited 😀 We often celebrate Good Friday and Easter as a solemn reminder (well, the church background that I come from does anyway), but I reckon Easter should be a joyous occasion, a celebration because our greatest enemy has been defeated, not by ourselves, but by our Saviour! What is there NOT to celebrate?

These past few years have been a steep learning curve spiritually because God has been reminding me about the centrality of the cross and how Jesus dying on the cross is not about me, but about Him and how He wants to glorify the Father’s name, and calls me to do the same. So it will be a special time and I’m definitely looking forward to it.

Now, I don’t really know where this tradition of eggs, chocolate and bunnies came from, and how it was suddenly connected to celebrating Easter, but a quick read from Wikipedia tells me that Easter eggs may have started from the traditions of when Christians were ‘celebrating’ Lent, they were not allowed to eat dairy (including eggs) so come Easter Sunday, they had to use up all their eggs (which they ate hard boiled at that time) as part of a Clean-Up day. Another view is that it could be from the symbolism created by the Catholic church where they dye their eggs red to represent the blood of Christ, and the shell of the egg represents the tomb and when they crack the egg open, it represents the new life in Jesus and his resurrection. I don’t know which is true, or if any are true and there are many other legends connected to this as well, which I found a fascinating read, but adds nothing to the meaning of Easter I think 😛

Chocolate Ginger Easter Egg Tart Chocolate Crust Pastry

So anyway, back to the tart – I chose to make this tart because as I was reading through the Masterchef Magazine, and this was the recipe that struck me because it uses ginger in dessert. Chinese usually do include ginger in their savouries and sometimes their sweets, because ginger, in itself, has nutritional qualities especially for confinement periods after giving birth! So, putting ginger into a dessert isn’t very unusual, but what was interesting was ginger in a western dessert. I tried to picture in my head what it would taste like, but because I didn’t normally like ginger, it was difficult for me not be biased against it. But I went against my own notions about eating ginger and went ahead and tried it anyway, because it looked so good in the magazine!

This is Marion Grasby’s recipe, and I whilst I followed the ingredients, our methods differed a little…this was how I did it last week!

Chocolate and Ginger Easter Egg Tart

  • Preparation Time: 2 hours
  • Setting Time: 2 hours
  • Serves: 10

Ingredients for Pastry:

  • 125g cold unsalted butter, chopped
  • 185 g (1 1/4 cup) Plain Flour
  • 25g (1/4 cup) Cocoa powder
  • 55g (1/3 cup) icing sugar
  • 2 egg yolks

Method

Line a 23cm tart pan and butter the sides well (especially when its not non-stick)

Combine the dry ingredients (butter, flour, cocoa powder, icing sugar) together in a food processor and blitz until it becomes like breadcrumbs. Then add in the 2 egg yolks and blitz together until it forms a dough. (I forgot to separate the above two steps, and blitzed everything together, which was fine, but it just didn’t mix that well, so I would recommend combining the dry ingredients first).

chocolate short crust pastry dry ingredients food processor

Just a tip I learnt about separating egg whites from yolks (which is probably old news for some), crack the egg horizontally  directly on the benchtop (not at an angle on a bowl like I used to). By doing that, you would get a perfect crack around the egg, making it easier to pry it open to take the yolk out. Awesome tip from Lifehacker!

Chocolate shortcrust pastry just formed food processor

Once the dough is formed, tip it out onto a clean counter top and form it together into a disc (round-ish) shape. Wrap it in cling wrap and then place it in the fridge for about 30 minutes.

Then, pre-heat your oven to 200 degrees (celcius). After 30 minutes, take it out of the wrapper and if you are so inclined to roll it out, you can roll it out and then place it onto the prepared tart pan.

Another Tip: But if you want to do it the lazy easier way, try this method instead. I like this method better because shortcrust pastry can be really crumbly and it’s quite difficult to roll out without it crumbling everywhere. Place the whole piece of pastry on the tart pan (ideally you would have shaped it into a flat disc) and press and shape the pastry into the tart pan making sure that its spread evenly.

chocolate shortcrust pastry pressed in pan

Then, poke a few holes onto the pastry with a fork and place it back into the fridge for another 20 minutes. Then take it out of the fridge, place a piece of baking paper onto the pastry and fill it with pie weights or rice. Then bake it in the oven for about 15 -20 minutes until its cooked. Let the pastry cool down. While it cools, you can start on the filling.

Ingredients for Chocolate and Ginger Filling

  • 250ml (1cup) cream
  • 1 tsp ground ginger
  • 20g unsalted butter
  • 350g dark chocolate, chopped
  • 125g glace ginger (sliced – if you like ginger, than bigger chunks, but if not, then dice into smaller pieces)
Glace ginger crystallized ginger sliced

In a saucepan, mix together cream, ground ginger and butter and stir with medium heat. Put the chocolate into a heatproof bowl…

Chopped chocolate heatproof bowl

…and just when the cream mixture starts to boil, pour the cream mixture onto the chocolate and stir until it completely melts. Stir in the glaced ginger and when mixed well, pour the filling into the cooled pastry tart.

chocolate ganache ginger glace mixture

Place the tart into the fridge and refrigerate for about 2 hours or until set. Then use Easter eggs to decorate it however you like! Just don’t be like me and use complementing chocolate flavours instead (i used mint chocolate and it didn’t really go together)

Marion Grasby's Chocolate and Ginger Easter Egg Tart Mint Chocolate Eggs

The ginger tart was…interesting. I didn’t like ginger that much, but in the chocolate tart it was not too bad – the chocolate seemed to mask the ‘bite’ that ginger has, but yet still has the taste. I realized how much ginger we had that night, and on top of it was more ginger in the dessert (that was totally coincidental). Those who loved ginger loved the tart, but those who didn’t mind it seemed to like it as well…but those that didn’t like ginger…hmm, I think they would have just preferred the chocolate part of it 🙂 I’m glad I tried to make it though, was an interesting experience and also it was a relatively simple tart to make. I have to say, the chocolate shortcrust pastry rocks..! I will definitely make it again the next time.

ps. How do you like our new theme?? I think we will stick with this for awhile!

 
3 Comments

Posted by on April 18, 2011 in Cookbooks, Desserts, Sunday Night Theme


Tags: , , ,

Need a snack in a hurry? Chocolate Palmiers

The best thing since sliced bread…in my opinion? Frozen puff pastry!! You put anything on it, chuck it in the oven and it comes out tasting fantastic. You can even eat it on it’s own (like Gardenia). But on a half serious note, puff pastry makes life so much easier especially when it comes to making quick snacks or dessert. We had fellowship on Monday at BSF, so that means bringing something quick to share with everyone. And since I work full time, I needed something quick (and something sweet!) so I chose to make Chocolate Palmiers. It’s soooo easy, I guarantee it!

Hazelnut spread Nutella chocolate palmiers puff pastry

I got this idea from the Baking Cookbook introduced in the Crumpet post.

Ingredients
3 sheets of puff pastry
Nutella or any hazelnut spread (we used the cheaper version, Nutino :P)
Hazelnuts
Sugar

Method
First we had to prepare the ingredients, so we bought fresh hazelnuts from Angry Almonds – which I just found out, now trades as 2brothersfoods! – in Subiaco Station Street Markets (fantastic range!), then we roasted them in a tray using low heat (100 degrees) for about 15-20 minutes.

Whole-hazelnuts with skin

Turn up the oven heat to about 200 degrees. Then chop the roasted hazelnuts up into as fine or as rough as you want it. I like chunky bits, because I crunching into the nuts…I like to bite into ice cream too, which my husband considers a little weird. But that’s a story for another time.

Chopped hazelnuts Suntoku knife

Take the puff pastry out of the freezer and let it thaw. Then start spreading your hazelnut spread on it. I realized my spread wasn’t sticking because the surface was so smooth (and wet because of the condensation), so I spread it on the side where you peel the film off because it was a little drier. Then sprinkle the hazelnuts on top, as liberally or as stingy-ly as you like. What can I say, I like my nuts! (ok, that sounds wrong).

hazelnuts and hazelnut spread nutella

Then roll the puff pastry sides together until you get like a rolled up scroll – I like to roll it a bit tighter so that the tendency for it to unravel is less 😛 Then, when you have rolled it together, just put a little bit of water where the two ends meet so that it will stick.

Half rolled puff pastry with nutella and hazelnuts

Using a sharp knife, slice it up into about 1-1.5cm pieces and flatten it a little with a cake spreader (or anything that can be used to flatten it).

Chocolate hazelnut palmiers puff pastry

Then it’s as simple as sprinkling the sugar on top (once again, as liberal as you like) and then placing it in the oven for about 10-15 minutes or until it browns.

For best results, eat them immediately! But if you’re packing it for later, let it cool completely on a wire rack before putting it away, or it will get soggy (like some of mine did :() But there you go, guaranteed success with frozen puff pastry, and it’s such a simple thing to make too! So, if you’re so inclined to share, tell us what have you done with your frozen puff pastry?

 
Leave a comment

Posted by on April 14, 2011 in Desserts, Fast Foodies, Snacks


Tags: , , , , ,

Easy Dessert: Pandan Agar-Agar (Jelly)

Pandan-leaf agar-agar jelly green

I love simple dessert recipes – especially in this day and age where everyone is busy, has a full time job and not having much time to cook, let alone make dessert! We don’t usually have much dessert after meals and they are usually a treat.  The most frequent “dessert” that I remember eating in our family are fruits! Imagine my surprise knowing that Westerners have dessert (cakes, pastries, tarts) after meals most of the time 🙂

Sometimes, asian desserts are not too difficult to make, especially with modern technology and how everything comes in packets! I got this agar-agar recipe from a book that I picked up during one of my travels back home to Malaysia. Many times, I crave home made or bought kuihs and dessert so I thought that I’d try my hand at some of the local delicacies.

Malaysian Cakes and Dessert

I’ve chosen to make the Pandan Agar-Agar because it was quite a simple recipe and once you’re done, all you have to do is store it in the fridge and forget about it until dessert time comes! “Agar-agar” is from the Malay word meaning “jelly”, and is a tasteless dried seaweed. It is used in many Malaysian desserts and is usually sold in small packets of white powder (but I was told, that it can also come in bars, strips or flakes). Interesting fact about “agar” from Wikipedia – when it’s not used for desserts, it is used as an agent for growth of bacteria or fungi (like in a petri dish) because ” microbial growth does not destroy the gel structure because most microorganisms are unable to digest agar.” NO WAY! Interesting for a noob like me anyway!

Back to the dessert!

Ingredients:

500ml (2 cups) water
3 tsp agar agar powder
120g white sugar
100 ml Pandanus Juice
(above made out of 7-8 Pandan leaves and 100 ml water)
120 ml thick coconut milk
1 egg (beaten)

Method:

Making the Pandanus Juice

Pandan-juice leaves green
We had to use frozen Pandan Leaves that we bought from our local oriental store and they come vacuum packed. Sadly beggars can’t be choosers, but if you do have access to fresh ones (Melbournians!), use them!

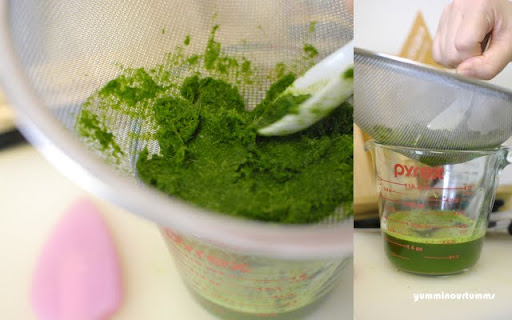
Pick about 7-8 leaves, wash them and cut them into 2cm pieces. Then put them into a blender (NOT a food processor! Once again, learnt the hard way) with 150ml water and blend well and until completely pulverized. Then strain the mixture through a fine sieve and push out the juice as required. Discard the solids. This should give you about 100 ml of pandanus juice.

Making the Pandan Agar-agar

pandanus jelly pandan

  1. Combine the water, agar-agar powder and sugar in a pan and heat until its boiling. Once it boils, reduce the heat to a simmer and continue unitl the powder completely dissolves which will take about 10-15 minutes.
  2. In a separate bowl, combine the Pandanus Juice, coconut milk and beaten egg together. Mix well.
  3. Pour the Pandan mixture into the agar-agar mixture in the pan and stir constantly until it comes back to a roiling boil. Once it reaches that point, remove the pan from the heat and pour it into a glass dish or cake pan (approx 16cm across).
  4. Set aside to cool completely. Then, place in the refridgerator to chill and set completely. You’d know that it’s completely set when it’s firm when you press down on it with a finger.
  5. Then cut it into any shape that you want! I used cookie cutters for mine 🙂 But you could, of course just cut it the quentessentially asian way by cutting diamond shapes.

Pandanus Jelly pandan agar-agar

I like how it automatically sets in 2 layers, makes it preetier…

It’s a really easy dessert to make and eat – it’s not too sweet and you could just pop a few in without even thinking about it 🙂 This plate was gone in about 5 minutes!

 
7 Comments

Posted by on April 7, 2011 in Asian Sweets, Cookbooks, Desserts


Tags: , , ,